Many websites now offer Login With Facebook as an option on their login pages. It is a very convenient feature to have on a modern website which is great for user experience. It simplifies login and signup by automatically obtaining some user credentials from Facebook and utilizing them on the website to quickly login or create a user profile. From social login, a website can collect information such as email, public profile, birthday, hometown and location. This information could be important to a website for many reasons, such as marketing and account personalization and most won’t mind entering this information – since they don’t need to manually type anything.
How To Add Facebook Login To WordPress
WordPress offers a few plugins to help make the process simpler, but there are still some technical things that throw off a lot of users who often abandon the idea. In this article, we will show you how to get things set up and working without working too hard.
Step 1: Create a Facebook Developer Account
To get started you will need to create a Facebook app to aid the integration. To do this you will need a developer account with Facebook. You can create that account here

Step 2: Create a Facebook App
Yes, we will be creating an App, much simpler than it sounds. Once you create a facebook for developers account you will be able to access your dashboard or Account page. Look for “My Apps” in the menu and select it. It will reveal links to your previously created app (if you had any) and the “Create App” Option will be there”. You can also find the Create App menu option by hovering over your profile image at the top right corner.

Step 3: Create an App ID
An App ID is basically a name or identifier for the App. Your Website Name plus “Login” Should be OK to use, for example: “Sitepact Login”. The email field should automatically populate with the email you use for facebook, if not then enter the same email that you use to log into your regular Facebook account. After Making the entries select “Create App ID“
Note: Do not use the word “Facebook” in your App Name.

Step 4: Select a Facebook Product
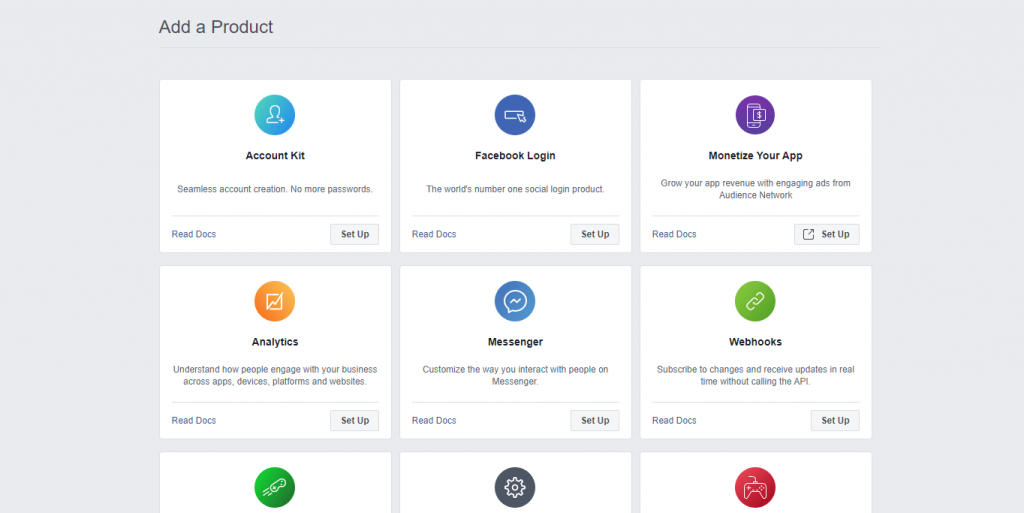
You will land on the “Add a Product” page where we can select the product relevant to what we are creating. In this case, we want to select the Facebook Login option. Select “Set Up” on the Facebook Login product.

Step 5: Select App Platform
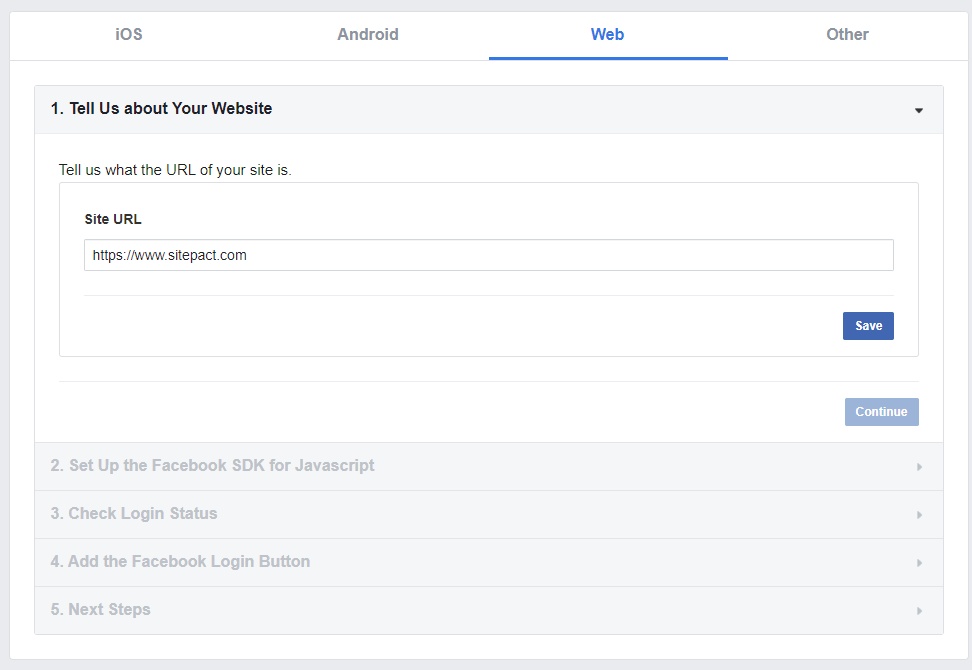
Following the selection of the specific product will be the selection of the platform the app is being created for. Facebook Apps can be created to work with mobile Apps and Web Apps or Websites. So, in this case, we will select the “Web” option.

Step 6: Enter Website Details
Here you need to enter the website name that you intend to implement the facebook login functionality on. Ensure that the domain name is spelled correctly to avoid connection errors.

Once you enter your website URL, click “save” and then “continue”. Since we are not implementing Facebook login using our own script, we will not be using any of the codes from step 2-4 in this tutorial. We skip over these steps using the “next button”.
By the end of this step, the App would now be created, but is not usable. In order to make the App live you need to enter some important information.
Step 7: Almost there
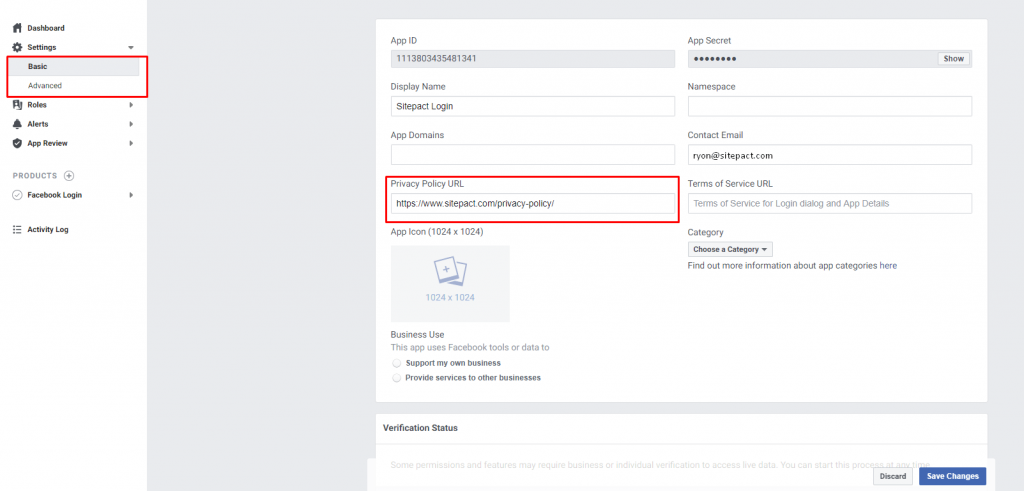
In order to proceed further, you need to enter a link to your website’s privacy policy. In the left sidebar select “Settings” then “Basic”. Then, in the main section, there will be a field for the entry of the privacy policy link. You can also fill the other empty fields but the minimum to get our app working is the privacy policy.
A Privacy Policy is a document where you disclose what personal data you collect from your website’s visitors, how you collect it, how you use it and other important details about your privacy practices.

Step 8: Make Our App Live
Now that we have entered those details we can proceed to make our app live. Click the On/Off toggle in the top right labeled “Status: In Development”. The “Switch to Live Mode” popup will appear and you can select the category; in our case “Business and Pages” and click “Switch Mode”.

If everything went well the toggle button should now be green as is shown below.

Integrating With WordPress
To complete the integration we will need to select a WordPress plugin to facilitate the integration. There are more than a few options that we could choose to work with. However, we will be using the WordPress Social Login (Facebook, Google, Twitter…) by MiniOrange. We decided on this plugin purely based on the fact that it supports multiple social channels that we can also easily implement. Most users will have multiple social accounts and might prefer to use a different platform to log in, so its always a good option to support multiple social logins.
Configure Plugin
Install the WordPress Social Login (Facebook, Google, Twitter…) plugin. If you do not know how to install a plugin then follow this tutorial. After install, go into the plugin settings and select facebook.

In order to get things set up, we will need to get the App ID and secret key from our facebook developers account. The keys are located on the Settings page of the app and are shown under the “basic” sub-menu as is shown below.

Once you have copied the keys you need to go back to facebook and add the Valid OAuth Redirect URI. To do that, you select settings under the product on the left side of the menu and enter the OAuth URL, which is usually https://yourdomain.com/openidcallback/facebook

Finally, go back to the plugin settings page under the “social login” tab and check the facebook checkbox and click save. That’s it!

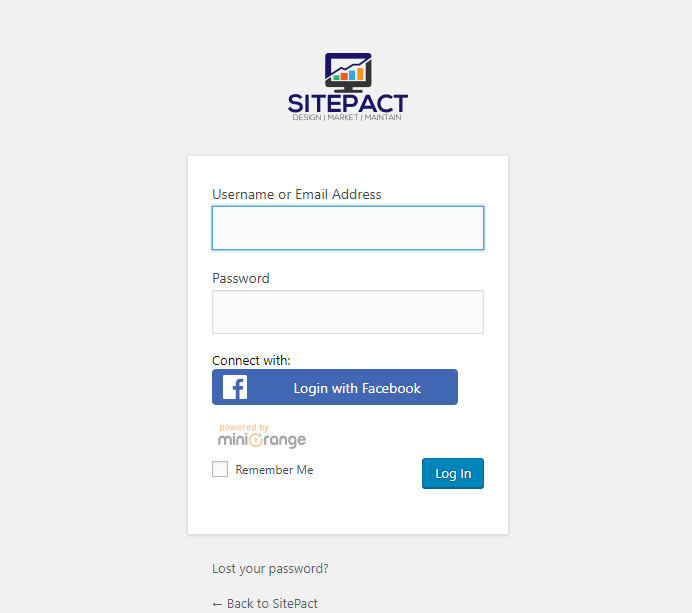
The End Result

The plugin utilizes shortcodes, so if you want your social login in some places that the plugin does not natively support then you can use the shortcode to place this anywhere on your pages. You can also define your icon types in your shortcode to ensure that the buttons match your website.
In case you are only planning to implement the facebook social login option on your website then you can consider using the Facebook Login for WordPress plugin because it is lighter. The reason for this is because Facebook is the only login channel that it supports and it has fewer options which make the setup process a little cleaner. The same main rules for setup applies as it relations to the use of your API and Secret keys.
Alternative Plugins
Nextend Social Login and Register – This is the most popular plugin and for good reasons. This is a really good plugin to use and it supports many channels. The only downside is that the free version only supports 3 main social networks, however for the value, this is worth the cost. The setup process is also just as easy and simple and good documentation is available.
Social Login – This plugin is a great option. It supports 40+ social networks and it is all free to use. It has a wealth of features and boasts simple integration and compatibility with some popular plugins such as WooCommerce and BuddyPress and like the plugins we previously discussed it offers a seamless integration process.
AccessPress Social Login Lite – Like Nextend Social Login and Register this plugin supports 3 main channels to upgrade to premium to get access to many more networks. The Lite version supports Facebook, Twitter, and Google which is enough for most websites based on the options usually offered.
If you would like to consider more alternatives, then check out this list of social login plugins.
Add facebook login without a plugin
If you are up for a little challenge then you can opt to code your own login script instead of using a plugin. WPbrigade offers a nice solution that you can follow step by step to get you set up here.
Wrapping Up
As industry trends change and customers have new experiences, it is important that website owners stay on top of these changes, especially in cases where they can be beneficial. Social login is one of those changes that offer the opportunity to gain and retain website visitors and customers.
I really hope that this post was beneficial and you were able to implement Facebook social login on your website. If you encountered any difficulties or need some advice feel free to drop your query in the comment section. You can also just let us know if you had enjoyed our article or if we missed anything important.

