Sometimes you may have felt the need to move your WordPress website to a new domain for the particular website that you are running to promote a specific business.
Thus, whether you need to change your domain name for rebranding purposes or you want to proceed with a change in the extension of your domain, you need to have some technical knowledge on how to move your WordPress website to a new domain without losing SEO or any important data.
Transferring your domain name on the spur of the moment isn’t a good idea, especially if you have an existing popular WordPress blog. However, there are legitimate reasons for doing so, and if the necessity comes, you’ll want to complete the task properly.
This will be a comprehensive step-by-step guide in which we will tell everything from scratch about how to move your WordPress site to a new domain. So, let’s get started.
To know about what exactly WordPress is, read through our blog post about WordPress.
What Is the WordPress Domain?

Whenever you use the search engine, you type the particular website name or search for different websites. So, the main purpose of any search is to reach a particular domain to visit the website.
In other words, we can say that a domain is a particular address of the website with which you can access its data and information given in it.
If the website is created using WordPress and the domain is obtained for the WordPress website, it is known as the WordPress domain.
Nowadays, there are many different WordPress domain names that you can purchase at different rates. It depends on the availability and scope of the particular domain.
Here, you might wonder why someone may need to change the domain name to study that in the next section.
Why Do You Need to Change Your WordPress Domain Name?

It is important to understand that changing the WordPress domain is not easy in all cases. However, whenever the company or business needs to revise its strategy, it may feel that changing the WordPress domain name has become inevitable. The most important scenarios include:
1. Rebranding
Whenever the company feels that a different domain can improve its image, explain or define its branding strategy more effectively and consistently, it may start thinking about rebranding. This can be achieved by changing the domain name. As most businesses run using WordPress, we can say that rebranding may become the most prominent cause of changing the WordPress domain name.
2. Domain Extension Name
Sometimes you become unsatisfied with the extension of the domain you are using.
For example, you may have some domain like websitename.WordPress.com, and you want to transfer your domain from the less popular extension to the more popular one, which will appeal best to your target audience.
Changing the WordPress domain has become a very important and crucial step that can boost your sales and make your brand noticeable.
What To Consider While Moving the WordPress Domain to a New Domain?

If you want to change your WordPress domain name, you must have some technical knowledge about the sites’ PHP code. Remember that code modification is something that requires special attention; otherwise, it may put your website at risk.
So, you must gather some comprehensive knowledge about the following things before you proceed with WordPress domain name alteration.
1. Complete Backup of Your WordPress Website
Remember that a mere backup is not sufficient to change your domain name. So the complete backup, which includes all the databases and the files, must be done for this purpose. You can backup your website using WordPress plugins like Duplicator or UpdraftPlus or manually do it through the file manager.
2. cPanel or An FTP Client
Suppose you wish to modify the WordPress domain. In that case, you’ll need to go into your hosting provider’s account and access your hosting account’s cPanel dashboard or activate FileZilla Client to accomplish so via FTP.
3. Find The Most Appropriate Domain Name
It is no secret that your new domain must be more suitable, adjustable, and better than the previous domain. So before you decide, it is important to do detailed and thorough research.
How To Move the WordPress Website Domain? (Practical Steps)
Now let’s proceed with the practical steps of changing the WordPress domain and moving WordPress to a new domain.
Step 1: Create a Duplicator Package of Your Site
The first step is to create a complete backup of your WordPress site. We’ll utilize this backup to make a copy of your website so you can correctly set up redirects from your old domain to the new one.
While there are many WordPress backup plugins available, we’ll be using the Duplicator plugin for creating a duplicate of your website.
Let’s start by installing and activating the Duplicator plugin on your old domain name.
Once activated, the plugin will add a Duplicator menu under the WordPress dashboard area.
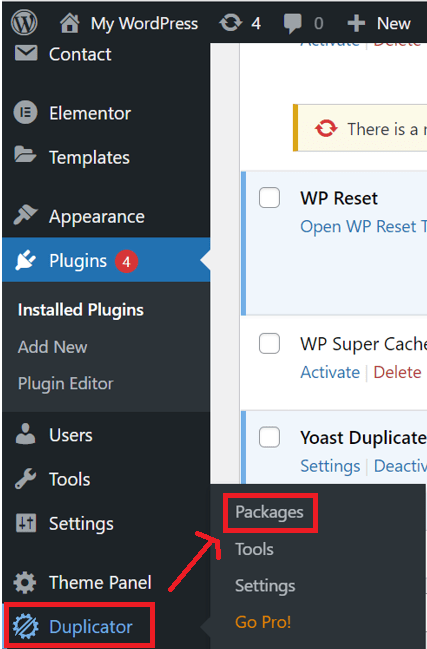
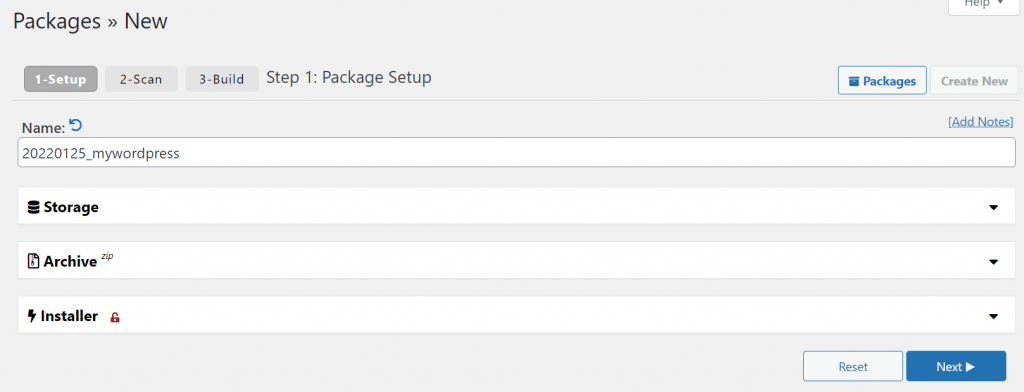
Now to start the cloning process, click on “Packages” and press the “Create New” button under the “Packages” page.

After that, you’ll be prompted to press the “Next” button to proceed.
Now the Duplicator will run the website duplicator wizard. It will first conduct checks to ensure that everything is in working order. If the plugin detects a problem, you will receive an alert with instructions.
When all items are marked as “Good,” click the “Build” button.
The plugin will now begin creating a duplicate package of your website’s files. Depending on the size of your site, this procedure may take a few minutes.
When you’re done, you can download the “Installer” and the “Archive” package. To download both files to your computer, click on the “One-click download” link.

The downloaded ZIP file contains a full backup of your WordPress files. It includes plugins, WordPress themes, uploads, permalink settings, and any other files made by WordPress plugins.
Whereas the installer script is a PHP file that unpacks the archive file and automates the running process of the WordPress migration.
Step 2: Purchase A New Domain Name

Go to any domain seller like Hostinger, Bluehost, or any other that you prefer.
After you have successfully opened and accessed the domain and checked its costs, purchase it.
The process of purchasing the domain is simple. All you need to do is select the particular domain, check its rate and make payment. After you get an email confirmation, the domain is available to you.
Step 3: Establish a Database for the New Domain Name
You’ll need a new SQL database to install WordPress onto your new domain before you can migrate your WordPress website to it.
You may leave it blank if you’ve previously built a database.
To build a database, log in to the cPanel interface of your hosting service. Now keep scrolling to the ‘Databases’ section and select the “MySQL Databases” option.
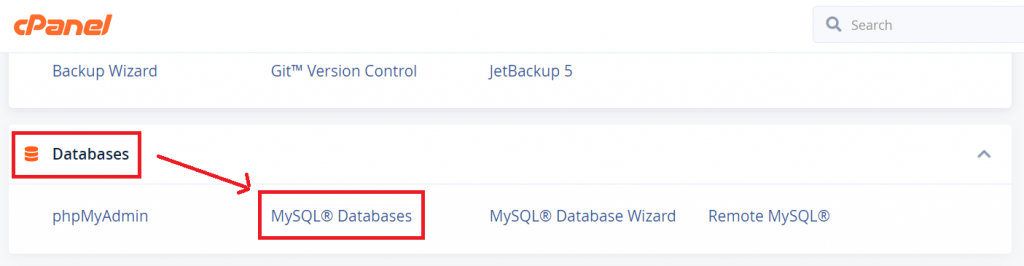
Please remember that your hosting control panel might differ from the screenshots attached. However, a Databases section with the capacity to create a database application ought to be available.
Give your database a name, and then hit the “Create Database” tab.

You will then have a database schema created by cPanel. Afterward, click on the “Go Back” button and scroll down to the “MySQL Users” area on the same page.
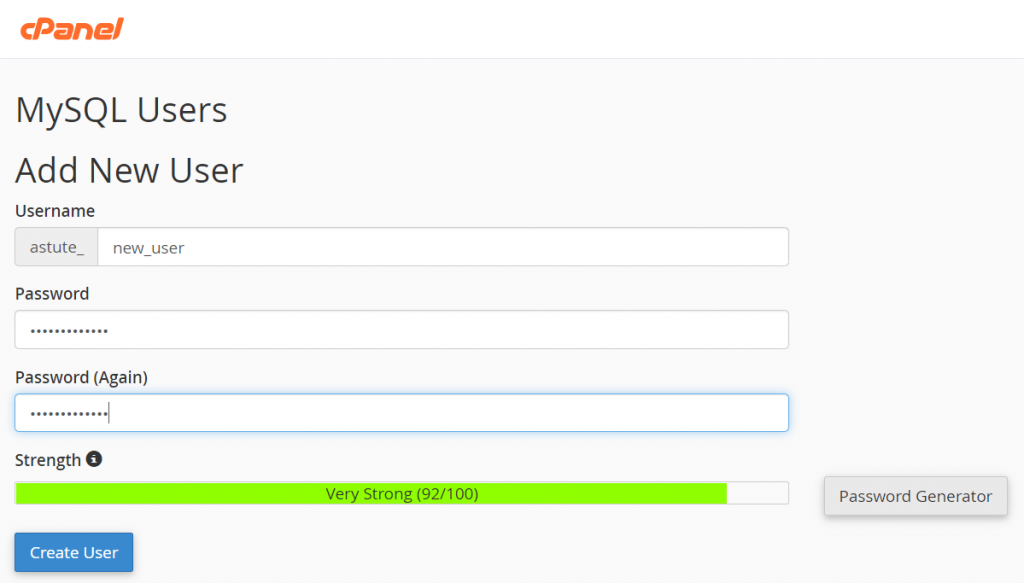
Here enter your new user login information and click the “Create User” button. Keep a record of the login and password in a secure location.
The newly formed user does not yet have the authorization to access the database. Let’s make changes.
Go to the “Add User to Database” section and select the user you created in the above step from the “User” dropdown menu. Then choose the newly created database and click on the “Add button.”

After creating the new user and database, you can manage user privileges under the “Manage User Privileges” section.

The database is now available to use in the migration of WordPress to the new web address.
Step 4: Consider Unpacking WordPress on the New Domain Name
You must now publish the Duplicator files or the files you have backed up using any backup plugin you already saved to your new domain name.
The WordPress setup is also included in the Duplicator or UpdraftPlus bundle. This eliminates the need to set up WordPress on your subdomain.
To begin, use an FTP program to link to your domain name. Once you’ve joined, ensure your website’s operating system is absolutely empty.
The ZIP and installation files can be uploaded to the root directory (typically public_html).
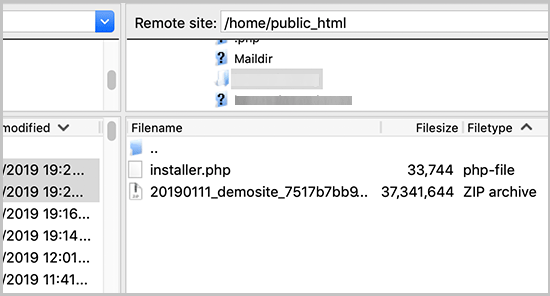
You may now unzip WordPress when both files have completed uploading.
To do this, open the following URL in a new browser window:
http://example.com/installer.php
Make sure to substitute your new domain name, for example.com. This will start the migration wizard for Duplicator.

The archive file will be searched for by the software. To proceed, tick the terms check and then click the Next button.
The software will now prompt you to put data for your WordPress website.
Your server will likely be localhost. The credentials of the database you generated for your different URL in the previous stage will be entered afterward.

To proceed, click once you’ve finished.
Duplicator will now extract your archived WordPress website back up into your target dataset.
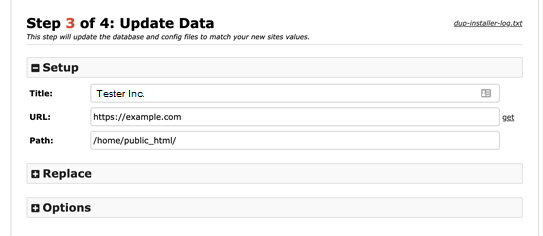
It will then prompt you to adjust the site’s URL or Path. You don’t have to make any changes because it instantly identifies your web domain’s updated address and path.
If that doesn’t seem to work, you’ll need to update the URL to reflect your updated domain name. Then, to proceed, click on the Next button.
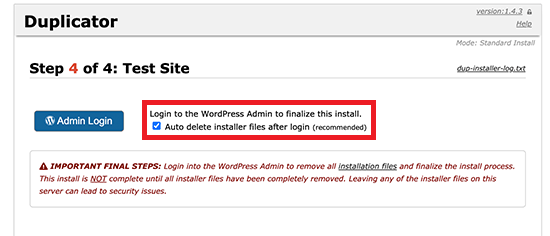
The transfer will now be completed by Duplicator.
To access the WordPress dashboard section of your site on a different URL, click the ‘Admin Login’ option.
Step 5: Set Up 301 Redirects for Long Term
Now it is time to redirect visitors to your new web address or domain from your previous one. 301 redirects are used to accomplish this.
The importance of 301 redirects for SEO and user experience cannot be overstated. By including them, you’ll be able to redirect users and search engines to your new domain name automatically.
Put simply, instead of getting a 404 error, whenever anyone visits an article on your old URL, they will be immediately forwarded to the identical piece of content on your new web address.
Maintain your old WordPress website alive so it may keep redirecting to the fresh one you just created to keep your redirects in place.
There are 2 ways to set up redirects.
1. Setting Up Redirects to New Domain Using a Plugin
We’ll use the Redirection plugin for this strategy. It’s the greatest WordPress SEO plugin on the market, and it makes it simple to optimize your WordPress site for search engines.
To begin, install and activate the plugin on your WordPress website. Then, click on Tools > Redirection under the WordPress Dashboard area to run the plugin’s setup wizard.

To create your first redirect, click the “Add New” button on the Redirects tab after you’ve completed the quick setup process.
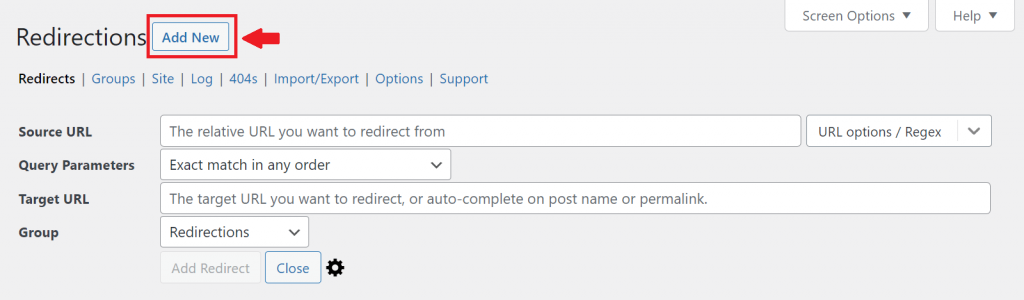
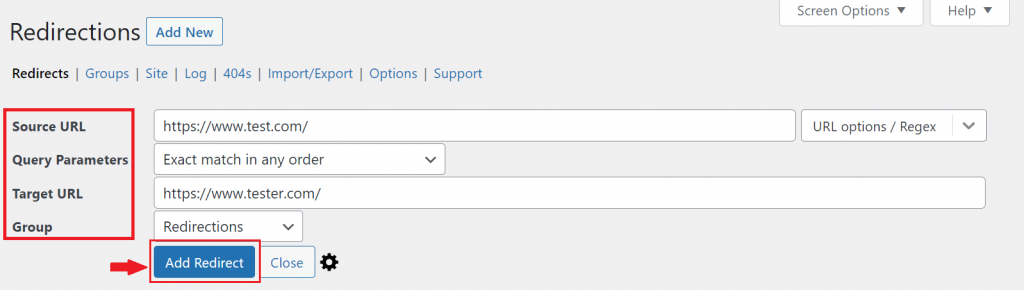
You’ll see four options; here’s how to set them:
Source URL: Enter the original URL to which you wish to redirect. This means that if someone comes to this page, they will be sent to another website.
Query Parameters: Leave this field empty by default.
Target URL: This is the new URL you want your visitors to visit. This means that if someone goes to the source URL, they will be sent to this URL.
Group: This field helps you to manage your redirects. Leave this field empty by default.
Once all the values are entered, click the “Add Redirect” button to finish the setup.
2. Manually Setting Up Redirects to New Domain
This solution requires editing the .htaccess file on your former domain name in WordPress.
To begin, use FTP to connect to your previous site and change the. htaccess file.
This will be in the same location as your wp-admin folders. Insert the below pieces of code at the very beginning of the .htaccess file:
- #Options +FollowSymLinks
- RewriteEngine on
- RewriteRule ^(.*)$ http://www.newsite.com/$1 [R=301,L]
Note: In the preceding code, substitute the old web address with your new one.
After you’ve made these adjustments, go to your previous domain name. It must take you to the new domain seamlessly.
Step 6: Inform Google About Your New Domain

It’s time to alert Google regarding the change of address as you’ve moved the WordPress site to a completely different new domain name and established redirection. It will assist Google in swiftly locating your new website domain and displaying it in search queries.
First, keep in mind that both your old and new domains are listed as separate domains in Google Search Console.
It can be checked from the Google Search Console account dashboard, where you can pick the old web address as the visible property.
Then, select the Settings screen from the left column and proceed with the ‘Change of Address’ tool.
Move to the Update Google section, choose your domain, and click the ‘Validate & Update’ option.
Google will now check if your previous domain is converting to the new one and save any modifications.
More About Transferring a Domain

The domain ownership will be transferred from your previous domain provider or operator (such as GoDaddy, 1&1, etc.) to WordPress.com when you migrate a domain.
Changing a domain does not influence the composition or design of your website. Transfer your blog content immediately if you want to configure your WordPress.com site before switching the domain.
Transferring a domain might take somewhere between 3 – 5 days.
Domains that have been newly registered for some short time can never be transferred unless they have been active for two months.
The annual and two-year WordPress.com subscriptions provide a one-year domain name credit that can be used to transfer your existing domain.
Your domain will get an extension for another complete year as part of the transfer process. If you updated the domain with your current supplier, you would not risk the renewal.
It won’t be feasible to move your address until the domain becomes eligible for renewals again (ten years for most domains, though less for some country-code domain extensions).
Once the migration is complete, you may use your WordPress.com account to handle all elements of your domain, including subscription, termination, and future transfers.
Conclusion
There might be various reasons for moving WordPress to a new domain. Fortunately, WordPress has developed URL address options and permits you to modify your address by manually tweaking the PHP code using a context menu or an FTP client.
You’ve learned how to move a WordPress website to a new domain name in this article. Here’s a basic summary of technical steps or actually what you will do:
- Create a duplicator package of your site.
- Purchase a new domain name.
- Establish a database for the new domain name.
- Consider unpacking WordPress on the new domain name.
- Set up 301 redirects for the long term.
- Inform Google about your new domain.
Give it a shot, and best of luck! Or still confused? Feel free to discuss your confusion and queries in the comment section below.
Make a quick comment right now over on Twitter @sitepact
